Tuesday, September 14, 2010

US Open 2010 Grand Slam 9/52

Unisphere, Corona Park, Flushing Meadows, NY: F-4.5, 1/50 exposure, ISO 1600


Louis Armstrong Stadium: F-16, 1/125 s, ISO 400

I've been wanting to check out the US Open for a long time and I finally had the chance to go during labor day weekend. We got tickets to the evening session and watched a third round match between Novak Djokovic (3-seed) vs. James Blake from the upper promenade of Arthur Ashe Stadium. The panorama below is actually 2 panoramas stitched together and is the view from our seats. Louis Armstrong Stadium used to be the main show court for big matches before Arthur Ashe Stadium. The Unisphere is located in Corona Park near the grounds of the US Open and is famous for being in the movie Men in Black. Congrats to the eventual winner Rafa! But, still wish Federer won.


Arthur Ashe Stadium: F-5.6, 1/80 s, ISO 1600


Tuesday, September 7, 2010

Institute of Contemporary Art 8/52


Another one of KL's friends came to visit Boston recently and we've been trying to do different touristy things with each visitor. This particular friend liked art, so off to the ICA...In addition to displaying a lot of interesting art, the ICA is one of the most interesting architechtural buildings in Beantown. Sadly, we weren't allowed to take pics of any artwork which included a section displaying Obey art. The indoor pic was the only area where we could take photos and it overlooks the Boston Harbour. We were lucky enough to have gone on a Thursday when it is open to the public for free between 5-9 PM.

ICA exterior: HDR, F-16, 15 second exposure, ISO 100
Indoor: F-14, 1/60 s exposure, ISO 400

Tuesday, August 31, 2010

Experimenting with Strobes Part II 7/52


Crystals: F/16, 1/100 exposure, ISO 100
Cocktail glass: F/25, 1/100 exposure, ISO100


Tuesday, August 24, 2010

Experimenting with Strobes 6/52


So we learned a little more about product/still life photography this week. Although I don't know when or if I'll ever get around to buying those expensive strobe lights ($1000 each), it was still a pretty fun exercise. We took pictures of pretty mundane ordinary things as you can tell, but you can imagine replacing the forks and spoons with a commercial product.

For shiny objects like crystal or silverware, placing the objects in a lightbox and diffusing the light is highly recommended. In this case, strobes were placed above the objects, and also under the frosted plexiglass.

What you need: Power source, strobe lights, reflectors, light meter, hot shoe coupler, frosted plexiglass, light box or black/white background. Long story short: 1) connect power source to camera via coupler, 2) connect strobes to power source, 3) place product on frosted plexiglass, 4) position your strobes, 5) place light meter near product to get a reading. We want high F-stop (16+) and ISO 100 for good depth of field and greater detail. (* light meter has a white dome that senses the light. It is also retractable. For 2D objects like paintings, use light meter retracted. For 3D objects, use the light meter with the dome up.

Green glasses: (F-16, 1/13s exposure, ISO 100)
Silverware: (F-22, 1/80s exposure, ISO 100)

Tuesday, August 17, 2010

Mount Monadnock 5/52

Some of KL's friends visited us over the weekend and we decided to check out the 2nd most hiked mountain in the world, second only to Mount Fuji. After a 2 hour, thigh burning hike up the trail, we finally stood atop Mount Monadnock 3,165 feet above sea level. We enjoyed a 360 degree scenic view of the White Mountains while eating a scrumptious avocado, egg and turkey sandwich.

F/13, 1/2500 s exp, ISO 400


Sunday, August 8, 2010

Vieux Montreal 4/52

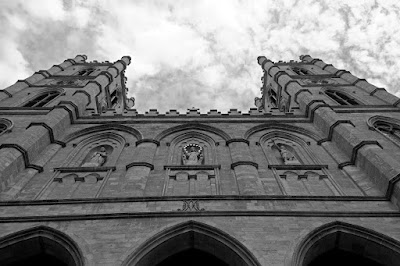
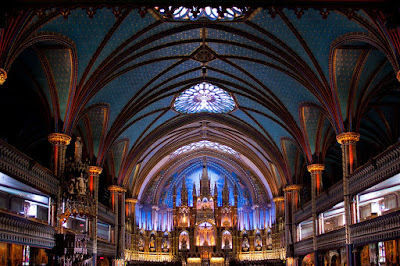
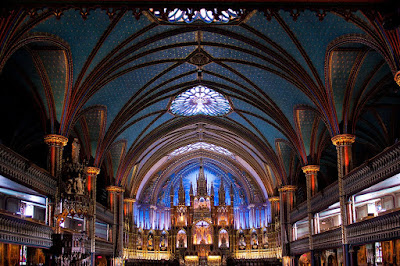
So I decided to go on a mini-getaway to Montreal with KL. We were exploring Old Montreal and happened upon Notre Dame Basilica. Fascinated about the history behind the church, we decided to "donate" $10 dollars to see the inside. Not knowing what to expect, we were pleasantly surprised at how rich and colorful everything looked. So out came my camera...
Also, I felt the images taken inside could be used to demonstrate the sharpening tool in PS.

Sharpening your images can help you bring out more detail. It is usually one of the critical steps performed in post-processing of most digital images. If you have Photoshop CS5 and you click on the "Filter" pull down menu, you will find the tool that helps you "Sharpen" your image. Next you will see the following options: sharpen, sharpen edges, sharpen more, smart sharpen... and unsharp mask... According to my photography instructor, all those options are garbage except for unsharp mask.

Unsharp masking, contrary to its name, subtracts a blurred copy of the image away from the original image leaving behind the "unsharp mask." Contrast is increased at the edges of the original image and this gives the illusion of a sharpened image. If you want a more detailed explanation, you can visit http://www.cambridgeincolour.com/tutorials/unsharp-mask.htm.
So once you click on unsharp mask, the recommended settings are: Amount: 100-150%, Radius: 1.0 pixels, Threshold: 0.
Above is an image before being edited. Some people may prefer the softer image above while others may prefer the sharpened image below. (F-3.5, 1/10 exposure, ISO 1600)

Tuesday, August 3, 2010

Panorama Fun 3/52


Panoramas are a great way to provide a different visual perspective. To take a good panorama, it is important to keep the lens at 35 mm focal length (don't remember the reason why, but I'll find out). Each shot should also overlap 1/3 of the previous shot. F-stop should be at F11/16 for good depth of field and held constant for all shots. Once the shutter speed is set, it should not be changed either. This way, when the image is stitched together, the panorama will look fluent. The exposure may be different for each individual shot because of lighting, so you can just take the average of the highest and lowest shutter speed.

I used Adobe Bridge to merge the images and opened it in Photoshop CS5. To do this, select all the images in Adobe Bridge. Click Tools --> Photoshop-->Photomerge...
After this a window will pop up. Make sure Auto is selected and check the box at the bottom "Blend images together" Then just wait and voila.

Above are images taken of Lake Nick in Bolton-Est, Quebec(F16, 10 sec, ISO100) and the Boston Harbor (F11, 10 sec, ISO100).